VPN for Smart TVs
Learn how to connect your VPN to your TV- The different Smart TV operating systems and their VPN compatibility
- Using a VPN App to connect your Smart TV
- Using Smart DNS
- Using a VPN via your Router’s configuration
- Setting up a VPN for an Android TV
- Setting up a VPN for FireTV
- Configuring Smart DNS for your Smart TV
- Connect to Smart DNS with Surfshark
- Setting up a VPN connection for Apple TV in tvOS
- Setting up a VPN connection for Samsung TV (Tizen OS)
- Setting up a VPN for your WebOS (LG) TV
- Configuring your Router to connect to a VPN Service
In this article, we will show you how to connect a VPN provider to your smart TV, enhancing both your digital privacy and entertainment experience. We'll explore the reasons why a VPN is essential for smart TV users, including the benefits of accessing a broader range of content and safeguarding your online activities. Additionally, we'll provide a straightforward guide on choosing the right VPN service, along with detailed instructions for installing and configuring it on various smart TV platforms. Stay tuned for helpful tips and troubleshooting advice to ensure a smooth setup process
The different Smart TV operating systems and their VPN compatibility
Smart TVs come with various operating systems, each offering unique features and capabilities. Android TV is known for its vast app selection and Google Assistant integration. Apple TV, running on tvOS, is popular for its seamless integration with other Apple devices and services. FireTV from Amazon offers deep integration with Alexa and a vast selection of apps and content. Tizen OS, used by Samsung TVs, provides a user-friendly interface and a wide range of apps. Lastly, LG's WebOS is praised for its intuitive interface and extensive app ecosystem. Each of these operating systems offers different advantages, making the choice dependent on user preference and existing device ecosystems. Not all of these smart TV operating systems allow third party apps to be installed however. Setting up a VPN could therefore involve some extra steps.
| OS | VPN Apps | Via Smart DNS | Via Router Configuration |
| Android TV (Chromecast) | Yes | Yes | Yes |
| Fire TV (Firestick) | Yes | Yes | Yes |
| Apple TV (tvOS) | Yes* | Yes | Yes |
| Tizen OS | No | Yes | Yes |
| WebOS | No | Yes | Yes |
Using a VPN App to connect your Smart TV
This option is by far the easiest and most flexible option. You can download the App from the TV’s app store and configure it to use any country you want
Using Smart DNS
Smart DNS is a service where you configure a custom DNS service that makes it look like your based in a different country. Most VPN Providers offer a service like this to allow streaming of services in the US and are configured for one country only. If you want to change your location to a different country than the US, this solution might not be the right one for you.
For this option you will need to configure a custom DNS Server for your smart TV to use. The setup is fairly simple. We have outlined all necessary steps in the Smart DNS section below. The downside of this approach is that you are locked into one region, typically the US.
Using a VPN via your Router’s configuration
This is an advanced configuration, but offers a lot of flexibility. Use this option only if you understand what you’re doing and are familiar with connecting to your wi-fi router in your local network or have someone around that can.
Setting up a VPN for an Android TV
- Install the VPN app from the TVs Playstore. We recommend Surfshark VPN for their ease of use and great overall feature support.
- Create an account if you don’t already have one
- Or login to your existing account
- Select a country and server
- Exit the App, the connection will stay active
- That’s it, your TV is now connected to a VPN


Setting up a VPN for FireTV
- Click on the “Find” button on your FireTV home screen
- Search for the VPN Apps name
- Install
- Login to your account
Configuring Smart DNS for your Smart TV
This is the recommended method for tvOS (Apple TV), WebOS (LG) and Tizen OS (Samsung TVs). In order for this method to work your Smartphone or computer have to be connected to the same Wi-Fi network as the TV, or you know the IP address your TV is connected to. If your internet service provider changes your IP address regularly, you should configure your router to use a VPN service (see next section).
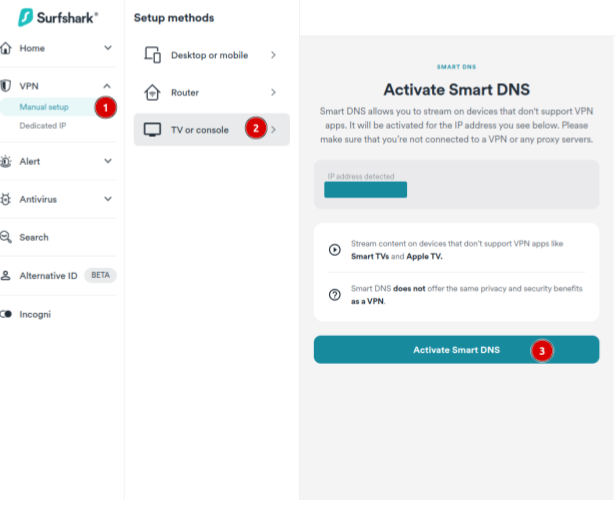
Connect to Smart DNS with Surfshark
The steps involved in configuring your TV to use a Smart DNS service are always similar, we will explain the process using Surfsharks VPN service.
- Make sure you are on the same Wi-Fi network as the TV your setting up
- Login to your Surfshark account via a web browser (The Smart DNS setting is not available to be configured via your Smartphone App)
- Click on VPN -> Manual setup -> TV or console
- Then activate Smart DNS. With Surfshark your DNS addresses are created instantaneously.
- You will now receive two Smart DNS IP Addresses, both can be used for the same purpose. Take note of these IPs or leave this browser window open, as you will need it for the next step.
Setting up a VPN connection for Apple TV in tvOS
If you’ve followed all the steps on how to activate Smart DNS, you’ve almost completed the installation for your Apple TV in tvOS VPN setup.
- The first is to use a Smart DNS server. It’s super easy to create one for your Surfshark VPN account. Refer to the previous section on how get a Smart DNS Address.
- Open the “Settings” in your Apple TV menu
- Click on “Network”
- Select your “Connection”
- Now chose “Configure DNS”
- Then on the Configure DNS screen select “Manual”
- Now enter the Smart DNS IP address provided by Surfshark (or any other VPN Provider)
- Click on “Done”
- Restart your Apple TV
Now your Apple TV will be connected to a VPN when connected to the Wi-Fi network you’ve created the Smart DNS for. Remember that your ISP might change your IP address and you will have to repeat this process or configure your router to use a VPN instead.
If you don’t want to set up Smart DNS or can’t because your ISP changes your IP address too frequently, please refer to the router setup below.
NordVPN now has a tvOS App
As of January 9th 2024 NordVPN is the first VPN provider to offer a native VPN app for tvOS (AppleTV). So if you have an account with NordVPN, simply download their tvOS App from the App Store to use a VPN with your Apple TV.
Setting up a VPN connection for Samsung TV (Tizen OS)
The following steps will configure your Samsung TV to use a Smart DNS service offered by a VPN provider. You will need the IP address from the previous step “Configuring a Smart DNS for your TV”.
- Open the Menu in your Samsung TV
- Click on “Network”
- Then select “IP Settings”
- In the “DNS Settings” block, click on “Enter manually”
- Chose “Enter manually”
- Enter the Smart DNS IP Address you’ve created with your VPN provider
- Restart your TV
Done! Your TV now connects to a VPN via Smart DNS service and you will be able to watch geo-restricted content on your TV.
Setting up a VPN for your WebOS (LG) TV
Refer to the Smart DNS setup to get Smart DNS IP Address first. Then follow these steps to configure your LG TV (or webOS Device).
- Go to “Network” Settings of your TV
- Click on Wired or Wi-Fi connection, depending on how your TV is connected to the Internet.
- Click on “Advanced Wi-Fi Settings” (or Advanced Ethernet Settings)
- Click on the “Edit” Button
- Uncheck “Set Automatically”
- Enter the Smart DNS Address from the previous step into the “DNS SERVER” field
- Click on “CONNECT”
- Wait until the new connection has been established
- Done!
Configuring your Router to connect to a VPN Service
This is a more advanced installation and requires knowledge of how to connect to your Router settings and adjust the configuration. We recommend the setup via the App (for Android and FireTV) or Smart DNS. If however those options are not available for you or your ISP changes your IP regularly, follow this video tutorial to configure your router to connect to a VPN.